Stylish Dreams: A Playful Display Font for Makers
There’s always a moment in the craft room when a project needs something more. I was designing a batch of soy candle labels last week—warm vanilla, cinnamon clove, the kind of scents that wrap around you like a blanket—and every font I tried felt either too delicate or too predictable. The labels needed to feel festive but not gimmicky, handmade but polished enough for a boutique shelf. That’s when I opened Stylish Dreams and everything clicked.
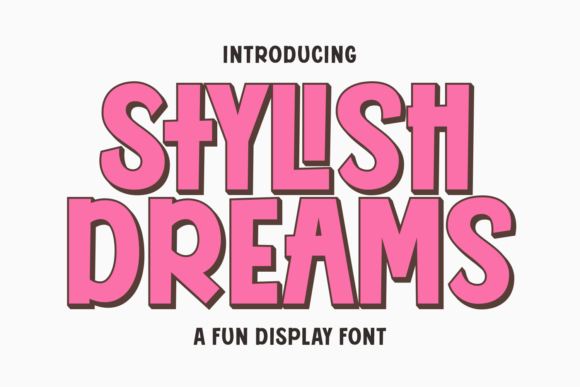
This is not a quiet font. It walks into a design and immediately becomes the focal point. Chunky, bold outlines give it a confident, almost playful silhouette that feels like it was made for holiday markets, product launches, and gift-ready packaging. Yet there’s a softness to the letterforms that keeps the font friendly and approachable. It’s decorative without being fussy, bold without shouting, and that balance is exactly what product makers, printable creators, and small shop owners often spend hours searching for.
What Stylish Dreams Looks and Feels Like
Stylish Dreams lives comfortably in the display font category, and it wears that identity with personality. The letterforms are thick and rounded, with a hand-drawn charm that avoids feeling childish or messy. The chunky outline style creates a natural sense of importance—this is the kind of typeface you put on the front of a greeting card, the top of a sticker sheet, or the center of a wedding welcome sign. It brings an immediate festive energy, but I found it equally effective on non-holiday items like baby shower tags, brunch menu covers, and boutique thank-you cards.
Visually, it carries a modern typography spirit without losing warmth. There’s a subtle bounce in the baseline that gives it a custom-lettered feel, which is a huge asset when you’re trying to make a printable wall art piece or a digital download preview look like it was drawn specifically for that project. The font’s outline structure also means it pairs beautifully with solid fills, layered vinyl cuts, or even metallic foil effects when printed.
Testing Stylish Dreams on Real Product Mockups
I ran this typeface through a handful of product design scenarios to see where it thrived and where it needed support. The first test was the candle label I mentioned—a 2.5-inch round sticker with a short product name and a tiny scent description. Stylish Dreams handled the product name brilliantly. It filled the space with personality and made the design look intentional and cohesive. For the scent description, I switched to a clean sans serif font because the chunky outlines became harder to read at 8pt, and the decorative nature of the display font demanded more breathing room.
Candle Labels and Small Packaging
On small circular labels, the font needs careful sizing. I kept it above 18pt for optimal cut-friendly readability. When I tested it on a Cricut machine with adhesive vinyl, the bold outlines weeded cleanly—no thin connectors snapping or tearing. The chunky structure actually became a production advantage; there’s less delicate linework to worry about during transfer. For product packaging design, it added instant perceived value to a simple kraft box.
Greeting Cards and Invitations
Moving to a 5x7 greeting card layout, Stylish Dreams truly shone. A large “Happy Birthday” header in this font gave the card a celebratory, almost retro-candy-shop energy. For a wedding invitation suite, I used the font for the couple’s names across the top of a folded card, then paired it with an elegant serif font for the body details. The contrast was stunning—playful display typography anchoring the design while a classic typeface carried the formal information. It also worked beautifully on an invitation mockup where the font was set against a soft blush background with floral accents.
Printable Wall Art and Planner Pages
For crafters selling digital downloads, this font brings a lot of mood. I designed a quick 8x10 printable with the phrase “Let’s Stay Home” using Stylish Dreams, and it felt like a cozy, farmhouse-style piece without needing extra illustration. On a planner divider page, the font labeled sections like “Weekly Goals” and “Meal Plan” with cheerful authority. Because the font is so visually distinct, it created a strong emotional appeal that made the planner pages feel more curated, almost like a stationery set you’d buy at a high-end paper shop.
Stickers, Tote Bags, and Merchandise
Sticker designs thrive on bold shapes, and this font delivered. A sheet of motivational sticker designs—phrases like “Dream Big” and “Stay Bright”—looked unified and punchy. When I transferred the same designs to a tote bag mockup, the font held its visual weight at a larger scale. For apparel like shirts and tote bags, the chunky lettering meant the design didn’t get lost in the fabric texture, a common issue with thinner scripts. Mug designs also tested well; the outline width stayed crisp in a standard 3.5-inch print area.
Readability, Size, and Cutting Machine Advice
This is a display font through and through, and it performs best when used for short phrases, names, titles, and decorative wording. For small stickers below 1.5 inches or dense label information, I’d recommend switching to a supporting typeface. The chunky outlines naturally reduce counter-space inside letters, so characters like “a” and “e” can start to close up at very tiny sizes. On printed cards, anything above 12pt remained legible, but for cutting machine projects, I’d suggest keeping it above 0.5 inches in height for clean weeding.
- Best for: titles, headlines, product names, short quotes, decorative signage
- Use with caution: body paragraphs, tiny tag strings, dense ingredient lists
- Cutting machine tip: test-cut a single letter first to confirm pressure and blade settings
On digital mockup previews and listing images, the font added instant product personality. When I used it on an Etsy-style thumbnail for a printable bundle, the text felt like part of the design identity rather than an afterthought. This is invaluable for brand consistency across a shop’s visual presentation.
Pairing Stylish Dreams with Other Fonts
To balance its bold personality, I paired Stylish Dreams with a simple sans serif font for supporting text. The contrast between chunky outlines and clean sans lettering created a professional hierarchy without competing for attention. A modern handwritten font or delicate script font also worked nicely alongside it, especially for wedding suites or boutique tags where you want a mix of soft and striking. For signage and social media graphics, a bold serif font in a smaller size provided an editorial contrast that felt elevated and thoughtful.
One of my favorite combinations was using Stylish Dreams for the main product name on a candle label, with a light sans serif for the scent description and a small serif for the brand tagline. The result looked like a complete brand identity rather than a single product design.
Things to Check Before Selling Your Work
When you purchase this premium font, you’ll want to review the included file formats and any alternate characters, ligatures, or swashes that come with it. Some versions may offer multilingual support, which is worth confirming if you serve an international customer base. Most importantly, verify the commercial font licensing terms to ensure you can use Stylish Dreams on physical products, digital templates, SVG-style designs, and print-on-demand merchandise without restrictions. The last thing any maker wants is a licensing worry after investing time and materials into a product line.
Where Stylish Dreams Feels Most at Home
From holiday tags to birthday invitations, from farmhouse wall art to modern boutique packaging, this typeface brings a sense of occasion without being tied to a single season. The playful outlines work beautifully for Christmas designs, but I can also see it living on a spring market sign, a summer party invitation, or an everyday product tag for a bath and body line. It’s the kind of creative font that adds emotional appeal and helps handmade products feel finished, intentional, and ready to sell. For any maker wanting their shop’s aesthetic to feel memorable and warm, Stylish Dreams deserves a spot in the design assets folder.
Stylish Dreams: A Bold Display Font for Web Design
A few days ago, I was refreshing the hero section for a boutique online store that sells handcrafted ceramics. The brand already had a soft, organic color palette—clay tones, muted greens, warm neutrals—but the typography on the main banner felt too safe. A standard sans serif headline read clearly, but it didn’t feel like anything. It didn’t match the personality of the pottery, which was intentionally imperfect, celebratory in its textures. I decided to test Stylish Dreams as a bold replacement for the primary headline, and the shift in energy was immediate.
This is a display font that understands how to command attention without overwhelming the rest of a layout. In the context of web design, that’s a rare and valuable quality. Too many decorative typefaces dominate a page, forcing the designer to fight against their own typography choices. Stylish Dreams balances presence with playfulness, which made it a natural fit for hero sections, landing page headers, and any digital touchpoint where a brand needed to express warmth and confidence simultaneously.
Visual Personality and Digital Appeal
Stylish Dreams belongs to a family of chunky outline typefaces that feel hand-lettered and celebratory. It has a festive undertone, but on screen, that translates into a sense of occasion. Every headline set in this font feels like an announcement. For a creative portfolio site, it gives the designer’s name weight and memorability. On a course sales page, it makes the promise of transformation feel more tangible. The bold, rounded letterforms soften the digital edge that many websites carry, creating a more human, approachable brand identity.
From a design assets perspective, the font works like a visual anchor. It draws the eye naturally, which means you can use it sparingly and still shape the user’s scanning behavior in a meaningful way. When I placed it over a full-width image banner on the ceramics site, the headline stayed readable because the thick outlines held contrast even against a busy photographic background. That’s a practical win for any web designer juggling multiple content layers.
Testing Stylish Dreams in Real Web Layouts
I tested this typeface across several digital scenarios: a coaching website landing page, a product launch banner, a blog redesign header, and a portfolio homepage. Each context revealed different strengths, and a few limitations worth noting.
Hero Sections and Landing Page Headers
In the hero area, Stylish Dreams performed exactly as a premium display font should. I set the main headline—around 48px to 72px on desktop—and the font filled the top third of the page with personality. On a dark background with soft white text, the outlines created a glowing, almost dimensional effect. On a light background, the chunky letterforms felt sturdy and grounded. For a call-to-action area directly below the hero, I used a smaller sans serif for the button text, which created clear visual hierarchy without competing styles.
Mobile Responsiveness and Readability
On smaller screens, the font needed careful adjustment. I scaled it down proportionally so the headline remained bold but not broken. The outlines, which add so much character at large sizes, can start to feel heavy on mobile if line height isn’t generous. I increased the line-spacing slightly and limited headlines to one or two short lines. Navigation text, form labels, and small interface elements should never use this font—it’s simply not built for that role. But for hero titles and section headings, it stayed legible and retained its charm down to about 28px on mobile.
Image Overlays and Banner Graphics
One of my favorite tests was placing Stylish Dreams over a textured product photo for a campaign landing page. Because the font uses thick outlines rather than solid fills, it naturally separates from the background image without requiring heavy drop shadows or outlines added in CSS. This saved time during the design process and kept the banner feeling light and editorial. For a blog graphic or social media template, the same quality makes it an excellent choice for fast-loading visual content that still looks crafted.
Call-to-Action Buttons and Short Phrases
For buttons, I used Stylish Dreams sparingly. A short phrase like “Join the Waitlist” on a wide button looked distinctive and on-brand; however, I wouldn’t recommend using it on small, tight CTAs where every pixel matters. It works best when the typography has room to breathe—think announcement bars, promotional banners, or oversized clickable areas rather than compact form buttons.
Where This Font Adds the Most Value in Digital Design
Stylish Dreams shines when it’s used to create emotional appeal at the top of the page. For a boutique online store, it helps establish a brand identity that feels intentional and curated. On a portfolio site, it signals creativity and personality before a visitor reads a single sentence. For course creators and coaches, it brings warmth to sales pages and webinar landing pages without sacrificing professionalism.
I also explored using the font in a digital brand kit for a small business client. By pairing Stylish Dreams with a clean sans serif for body copy and user interface elements, the entire brand felt cohesive across web design, social media graphics, and email templates. The consistency strengthened brand trust and recognition across touchpoints, which is exactly what small business owners need when competing for attention online.
Pairing Strategy for Web Typography
Every decorative display font needs a reliable partner. For Stylish Dreams, I found the best pairings were with geometric sans serif fonts that had a neutral, modern structure. The contrast between chunky, playful headlines and crisp, clean body text created a layout that felt intentionally designed rather than accidentally mismatched. For a more editorial digital identity, pairing it with an elegant serif font for secondary headings or pull quotes added sophistication without making the page feel heavy.
In practice, this meant using the display font for H1 elements, keeping H2 headings in either the same font at a smaller size or in a complementary sans, and reserving paragraphs, buttons, and links for the simpler typeface. This kind of typographic hierarchy helps users scan content naturally while giving each section a clear role.
What to Avoid and What to Check Before Publishing
This font is not suitable for long body copy, dense dashboard interfaces, accessibility-focused text elements, or small navigation labels. It’s a creative font built for impact, not for paragraphs. If your project requires a highly accessible reading experience, use Stylish Dreams only in decorative areas where it won’t compromise legibility for users with visual needs.
- Avoid using it for form labels, error messages, or footer links
- Don’t set entire paragraphs in this typeface—reading fatigue sets in quickly
- Test on multiple screen sizes and consider how font weight renders across browsers
Before publishing, verify whether the font is available in a webfont format and check the licensing terms for commercial use on websites, client projects, online stores, and digital templates. Some display fonts include alternate characters or ligatures that can enhance headings, and these are worth exploring during the design phase. Also confirm multilingual support if your site serves a global audience. When you treat Stylish Dreams as a strategic part of your design assets rather than a default choice, it becomes a powerful tool for building brand identity through thoughtful web typography.